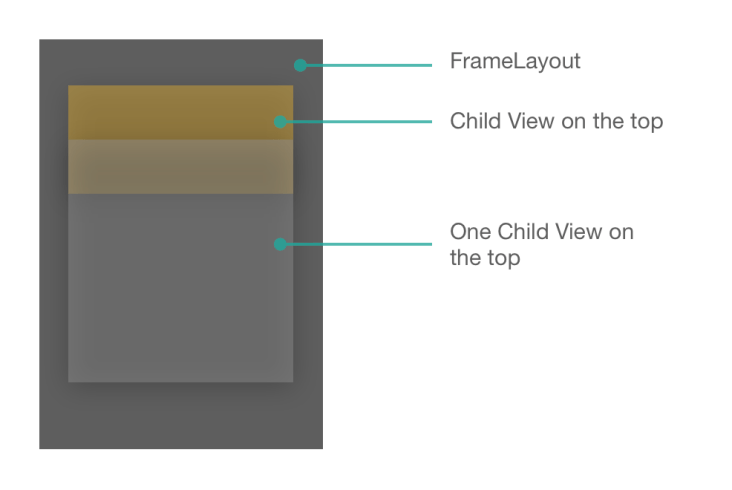
FrameLayout is another powerful layout which is used to stack child views on top of each other, with the most recent child on top of the stack.
FrameLayout is designed to block out an area on the screen to display a single item. Generally, FrameLayout should be used to hold a single child view, because it can be difficult to organize
child views in a way that's scalable to different screen sizes without the children overlapping each other. You can, however, add multiple children to a FrameLayout and control their
position within the FrameLayout by assigning gravity to each child, using the android:layout_gravity attribute.
Child views are drawn in a stack, with the most recently added child on top. The size of the FrameLayout is the size of its largest child (plus padding), visible or not
(if the FrameLayout's parent permits). Views that are View.GONE are used for sizing only if setConsiderGoneChildrenWhenMeasuring() is set to true.
FrameLayout is designed to display a single item at a time. We can have multiple elements within a FrameLayout but each element will be positioned based on the top left of the screen. In FrameLayout, all the child views added are placed like stack. The most recent added are shown on top. Hence the order of elements in the layout is of importance.
FrameLayout Attributes
Following are the most important attributes used in this layout:
android:id : This is the ID which uniquely identifies the layout
android:foreground : This defines the drawable to draw over the content and possible values may be a color value, in the form of “#rgb”, “#argb”, “#rrggbb”, or “#aarrggbb”
android:foregroundGravity : Defines the gravity to apply to the foreground drawable. The gravity defaults to fill. Possible values are top, bottom, left, right, center, center_vertical, center_horizontal etc
android:foregroundGravity
Defines the gravity to apply to the foreground drawable. The gravity defaults to fill.Must be one or more (separated by '|') of the following constant values.
| Constant | Value | Description |
|---|---|---|
| bottom | 50 | Push object to the bottom of its container, not changing its size. |
| center | 11 | Place the object in the center of its container in both the vertical and horizontal axis, not changing its size. |
| center_horizontal | 1 | Place object in the horizontal center of its container, not changing its size. |
| center_vertical | 10 | Place object in the vertical center of its container, not changing its size. |
| clip_horizontal | 8 | Additional option that can be set to have the left and/or right edges of the child clipped to its container's bounds. The clip will be based on the horizontal gravity: a left gravity will clip the right edge, a right gravity will clip the left edge, and neither will clip both edges. |
| clip_vertical | 80 | Additional option that can be set to have the top and/or bottom edges of the child clipped to its container's bounds. The clip will be based on the vertical gravity: a top gravity will clip the bottom edge, a bottom gravity will clip the top edge, and neither will clip both edges. |
| fill | 77 | Grow the horizontal and vertical size of the object if needed so it completely fills its container. |
| fill_horizontal | 7 | Grow the horizontal size of the object if needed so it completely fills its container. |
| fill_vertical | 70 | Grow the vertical size of the object if needed so it completely fills its container. |
| left | 3 | Push object to the left of its container, not changing its size. |
| right | 5 | Push object to the right of its container, not changing its size. |
| top | 30 | Push object to the top of its container, not changing its size. |
android:measureAllChildren : Determines whether to measure all children or just those in the VISIBLE or INVISIBLE state when measuring. Defaults to false
Some important points to note:
- FrameLayout can become more useful when elements are hidden and displayed programmatically
- If the gravity is not set then the text would have appeared at the top left of the screen
<?xml version="1.0"
encoding="utf-8"?>
<FrameLayout xmlns:android="http://schemas.android.com/apk/res/android"
android:layout_width="match_parent"
android:layout_height="match_parent"
android:orientation="vertical">
<ImageView
android:id="@+id/backgroundImage"
android:layout_width="wrap_content"
android:layout_height="wrap_content"
android:scaleType="centerCrop"
android:src="@drawable/flight_image" />
<TextView
android:id="@+id/descTextView"
android:layout_width="wrap_content"
android:layout_height="wrap_content"
android:layout_gravity="center_vertical"
android:layout_marginTop="70dp"
android:background="@color/colorPrimary"
android:padding="10dp"
android:text="TextView placed at the top of the Imageview"
android:textColor="@android:color/white"
android:textSize="22sp" />
</FrameLayout>
And output screen will be look like
The secret of FrameLayout is how it layouts its children. Although normally designed to contain one item, it will happily stack up other element on top of each other. Thus FrameLayout is essentially a way to manipulate the Z-order of views on the screen.
This is super useful for a couple of UI tricks from HUD-like elements to sliding panels to more complex animated transitions


